
Stop People Spoofing Email from Your Domain
Domain-based Message Authentication, Reporting and Conformance (DMARC) is an email-validation system designed to detect and prevent email spoofing. It can also help combat phishing and thus protect your reputation. DMARC is a framework that works on top of Sender Policy Framework (SPF) and DomainKeys Identified Mail (DKIM) and thus requires both SPF and DKIM to already be implemented.
All three standards have been designed to help prevent email spoofing, i.e. third parties sending email pretending to be from Someone@YourDomain.Com. A properly configured DMARC implementation can be setup so that third-party DMARC compliant email servers can be instructed to either monitor, quarantine, or reject spoofed email before it gets into the recipient’s inbox. Furthermore, DMARC reports are delivered on a scheduled basis so that you can measure the results of the policy you have implemented.
But wait — what is SPF and DKIM first?
Sender Policy Framework (SPF)
SPF is an open standard that allows a domain owner to publish a list of approved senders authorised to send email on your behalf. Let’s say that are using G Suite for email, but also send email through YourEmailServer.com. To setup SPF, all you need to do is add a TXT record to your domain’s DNS settings. You would use the following SPF record for G Suite:
v=spf1 include:_spf.google.com ~all
And let’s say you also want to add your own email server. You can simply include it as follows:
v=spf1 include:YourEmailServer.com include:_spf.google.com ~all
The following table shows the mechanisms that can be applied to an SPF statement:
| Statement | Result | Meaning |
| +all | Pass | Allow all mail. |
| -all | Fail | Only allow mail that matches one of the parameters (IPv4, MX, etc) in the record. |
| ~all | Soft Fail | Allow all mail, but mark it as an SPF failure if it doesn’t match. |
| ?all | Neutral | No policy statement. Neither pass nor fail SPF. |
The full syntax of SPF is listed here.
To validate that you have configured SPF properly, you can send a test email using this service.
The problem with SPF is that it only validates against the Return-Path which is the email address that the receiving servers use to notify sending servers of delivery problems. It does not look at the From header which is the more frequently spoofed address that is visible to the recipient. And just because SPF fails doesn’t mean that it will be blocked in the inbox as its one of several factors that email providers take into account. Furthermore, SPF breaks as soon as an email is forwarded.
This brings us on to DKIM.
DomainKeys Identified Mail (DKIM)
DKIM works by using asymmetric keys to sign email headers using a digital signature (private key) stored securely on an authorised sending email server. The sending mail server signs the email with the private key, and the receiving mail server uses the public (DKIM) key listed in your domain’s DNS information to verify the signature. One domain can have several DKIM keys publicly listed in DNS, but each matching private key is only on one mail server.
DKIM can be seen as a way of ‘signing’ emails to prove they came from your domain.
To configure DKIM with G Suite use the following steps:
- Log into the Google Admin Console https://admin.google.com/
- Click Apps > G Suite > Gmail > Authenticate email.
- Select the domain for which you want to generate a domain key.
- Click Generate new record.
- Click Generate.
G Suite automatically generates and stores the DKIM private key securely in its back-end and provides a DNS TXT record of the DKIM public key which is used by recipient email servers to authenticate your email.
The TXT record shown below is the public key which is used as the DKIM record in your DNS server when configuring DKIM with G Suite:
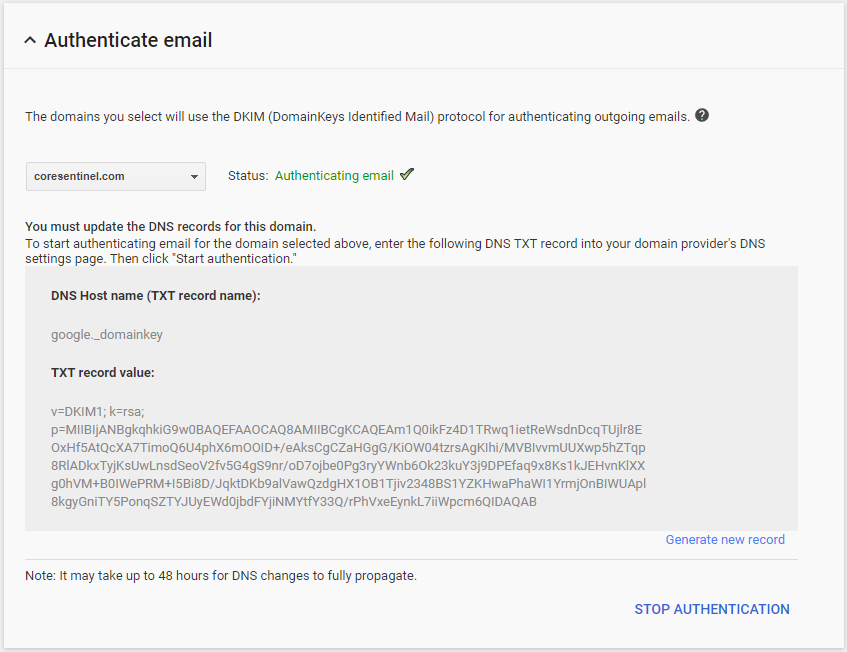
All you need to do to is then create the TXT record in your DNS server — it’s Just a simple copy and paste from the above G Suite screen. Give it a day or so for DNS to propagate and then you can come back to the same DKIM configuration screen in G Suite and click ‘START AUTHENTICATION’ on the bottom right to switch it on.
To verify DKIM configuration you can send a test email using the following service.
It’s great to have both SPF and DKIM setup. But even with DKIM, you are leaving it up to the recipient to check for the presence of the DKIM header.
The DKIM header is not visible to users unless they actually check the email header. And although recipient email gateways can be configured to either accept or reject email without DKIM headers, it is still up to the recipient to make that determination and not the sender.
Furthermore, there is nothing to say that DKIM should work with SPF, or that SPF should work with DKIM.
Domain-based Message Authentication, Reporting & Conformance (DMARC)
DMARC solves the problems associated with SPF and DKIM in the following ways;
- DMARC ensures that both SPF and DKIM work together at the policy level.
- The policy is defined and enforced by your organisation rather than at the recipient.
- The policy is measurable based upon the reporting function DMARC provides.
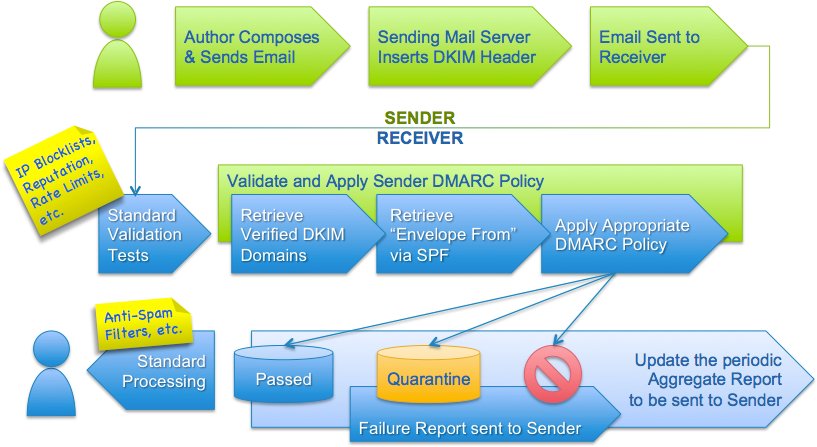
The following chart illustrates how DMARC works from when an email is sent to when it arrives:
How do I Configure DMARC?
Once SPF and DKIM have been configured correctly, DMARC is as simple as adding a TXT record to your DNS server. To start with you may want a policy which does nothing but monitor and report for a couple of months.
Name: _dmarc
Value: "v=DMARC1; p=none; rua=mailto:postmaster@your_domain.com"
That’s it. DMARC is configured. With the above configuration it will not enforce any policy, but send reports to you via email in XML format to postmaster@your_domain.com on a daily basis showing the details of policy pass and fails.
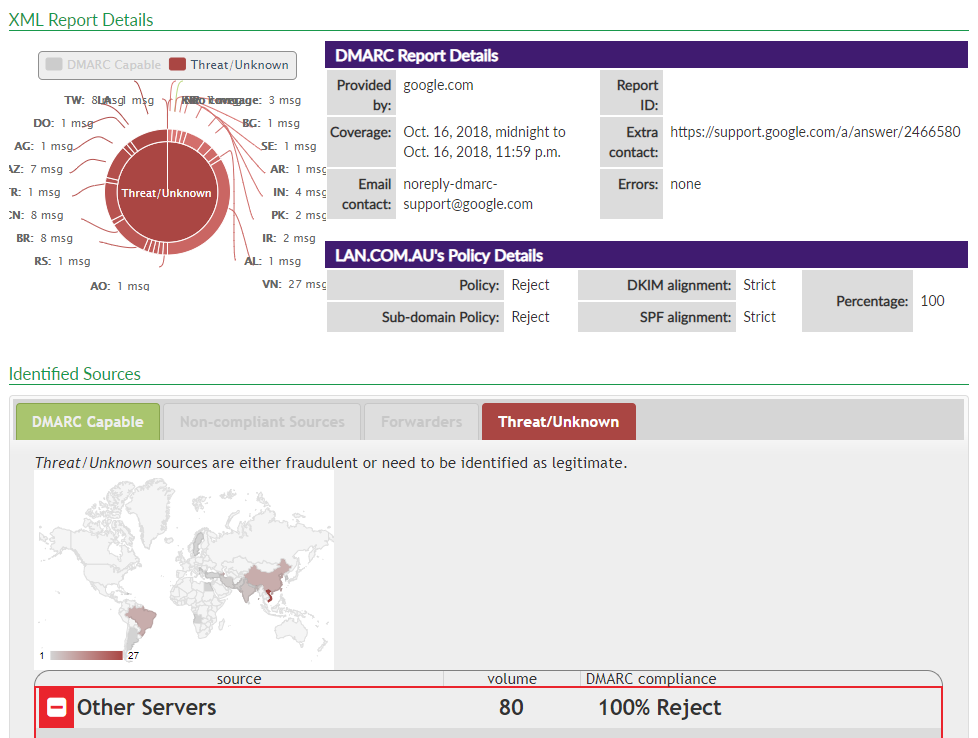
The XML format of the reports are not really human readable, but you can download the ZIP file containing the XML file and upload the ZIP file directly to the following DMARC (XML to Human Converter) report parser.
The following is a screenshot of the XML to Human parsed DMARC report output which can be used to identify the amount of legitimate email sent from your domain, as well as the amount of spoofed email. It also shows what policy was applied based upon each instance of an SPF or DKIM policy fail, or pass, and what the source of the email was.
Once you are happy that no email legitimately sent from your domain is failing DMARC policy, you can start to enforce the policy to either quarantine the spoofed email, or reject spoofed email on arrival.
Simply change the p (policy) statement from none to either reject, or quarantine in your DMARC record as follows:
“v=DMARC1; p=quarantine; rua=mailto:postmaster@your_domain.com”
A more in-depth look at DMARC tag values can be found here.
It’s important to note that not all internet mail servers are DMARC compliant. But according to a report by Valimail, 76% of email inboxes globally were enforcing DMARC policies in 2017. This is in comparison to 62% enforcement in 2015. Those percentages show a very positive trend that indicates that figure could be currently up to around 90% at the time of writing this article.
Conclusion
Well done! If you have followed this guide, you have successfully protected your domain against email spoofing thereby protecting your customers and your reputation as well as helping in the fight against phishing. For more expert security consulting and recommendations, why not engage us for a penetration test? For over 15 years we have been successfully working to improve the security posture of various organisations. Call today for a free quote.
![]()
Hack-proof Your Systems.
Other articles you may like:
Phishing: How To Take a Phishing Site Offline
Ransomware: Mitigating The Threat
How to Effectively Build Hacker Personas